Tutorial - Building NivoSlider Extension (Part 4)

Creating NuGet Package
 BlogEngine uses NuGet format for sharing extensions. NuGet package in a nutshell is a ZIP containing files you want to share with some metadata NuGet uses internally. The easiest way to create a package is to use Package Explorer. Download and install this small application on your local machine, then click to run as any regular Windows application. At the time of writing, I’m using Package Explorer version 2.0.
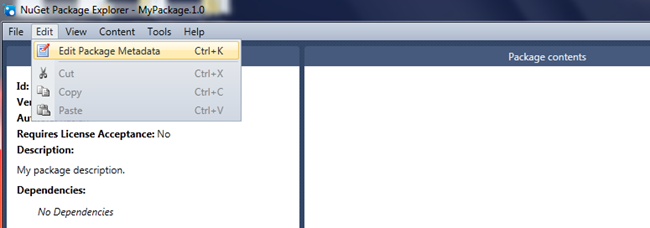
When Explorer starts, choose “create new package” and then “edit package metadata”.
Here you’ll need to enter few fields like package ID, version and author. All fields are self-explanatory and only few required. If you have a page or post dedicated to your extension, which is a good idea as you can provide mini-forum to extension users and forward traffic to your site, use “project url” for this.
Then you need to add all extension files to the package. First, use “content folder” – it will be a “root” of your website. Another important one is a “Lib” folder – all binary files used by your extension, if any, go here rather then in the “bin” folder under “content”. For NivoSlider, we don’t have any binaries, so we won’t use it.
Now we’ll use right-click and “add new folder” option to build folder structure exactly as it is in our BlogEngine project.
Files can be simply dragged from windows explorer to corresponding package folders. Here is an end result. As you can see, we have pretty large folder structure, which isn’t typical. For most extensions, you’d have single extension file under content/app_code/extensions.
To finish, click file/save and Package Explorer will save your job on the local drive as [ExtensionName].[VerionNumber].nupkg. We doe here – package is created and ready to be uploaded to online gallery and be shared with others.
Publishing Package
Before publishing Package, you need to register on dnbegallery.org. The process is very simple and straight forward, you only need to set user name/password, provide email and should be able to log in right away. Once logged in, go to "contribute" tab and click "add new package". Simple wizard will guide you through the process.
Start by uploading newly created NuGet package – navigate to where you saved package it and click “upload”.
Next you’ll be presented with almost same form you’ve seen in “package metadata” while creating package. Most of the fields we already filled.
But it also has few new fields – like package type (extension, theme or widget) with category. Select most appropriate for your extension and click “next”.
Last step let you optionally upload logo and screenshots for your extension, so add some nice pictures to the package and click “finish”. Gallery will publish package and within few minutes it should appear in the listing – all set! Now anyone can download this package from the gallery.
NivoSlider Usage
1. Using slider as a control in the regular (WebForms) theme
Common place to add slider control is a site.master page in your default theme. Open it up in the text editor and add control registration in the top section of the page:
Now you can add blog control anywhere in the page, for example right after header section. Its up to you where you want slider to appear.
<blog:NivoControl ID="slider1" Width="960" Height="370" runat="server" />
<div class="theshadow"></div>
Width and height are optional, if omitted defaults are 960 and 370 pixels. The “theshadow” DIV is also optional, it will add drop shadow effect to the slider. Shadow also 960 pixels wide, if you set slider to other size you’ll need to modify background image for the shadow, it won’t stretch or shrink.
2. Using slider as a Razor Helper in the Razor theme
If your theme is Razor theme, you would normally add slider in the site.cshtml of your theme. Similarly, open it in the text editor and add this anywhere you want slider to show up on the page:
@Helpers.NivoHelper.GetSlides("slider1")
3. Using as an extension to add slider to the post or page
Slider can also be added anywhere in the post or page. For this, inside your post, add slider token as shown below:
Again, only required part is slider ID as in example with slider1. Defaults are 650 and 220 pixels, if you need different sizes add them as :width:height inside slider token.
<iframe class="youtube-player" title="YouTube video player" src="http://www.youtube.com/embed/WCRya6UyeYo" frameborder="0" width="640" height="390"></iframe>


