BlogEngine.net on GoDaddy with SQL provider

This weekend I worked on incorporating one of the patches uploaded by Phil Garcia (thanks Phil!) that added SQL Server support to Extension Manager. Now you can pick your provider as usual and, if MS SQL Server is your provider, Extension Manager will persist settings to the database rather than XML file as it does by default. Personally, I don't use SQL provider for my blog; I'm totally satisfied with XML here. But I realize there are lot of people who feel differently about it and for whom database is a must. So I used this occasion as an opportunity to add test site to my hosting account and set it up to use SQL instead of XML to be able to try it in hosting environment.
I've read some horror stories about problems people running into setting up their blogs on shared hosting. My host is GoDaddy and I have cheapest plan that comes with one MS SQL server database, which is already taken by another application. This plan provide you with one application you can choose and GoDaddy can install it for you, and BlogEngine is on the list. But because they only support SQL server version and my DB already taken, I couldn't use it. Instead, I started by adding another standard BlogEngine installation (it is as easy as simply coping your files into new directory, you can read more about it if you run into trouble). Once you got it up and running, here is what you need to do to make BlogEngine use SQL server provider.
- Go to control panel and select SQL Server.

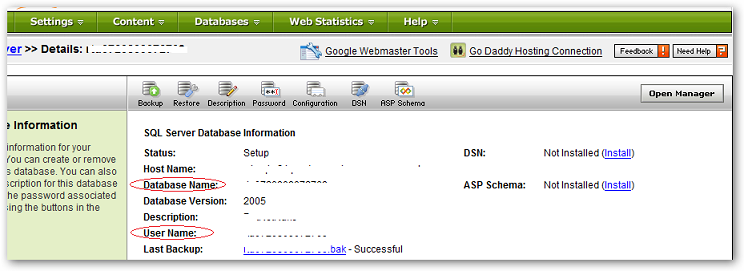
- You'll be presented with screen showing your database(s) list. Click "Open Manager" button and log into SQL manager web console.

- Open ~/setup/MSSQLSetup1.3.0.0.sql script using notepad (or any other editor) and select and copy everything.
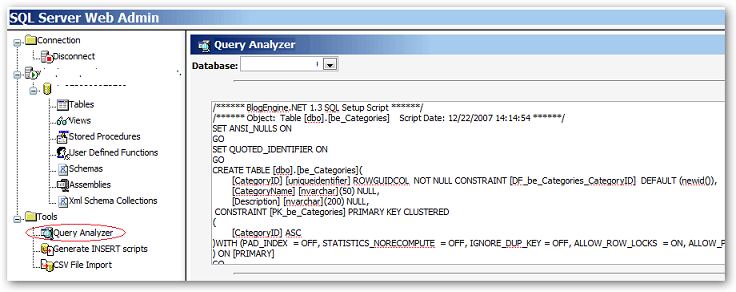
- Go back to web console and click "Query Analyzer". Paste selected script into text area and run it. (All tables in BlogEngine schemaprefixed with "be_" so you should be fine if you have other tables in the DB.)

- Now all that left is updating your web.config to use SQL server. You'll need to change connection string to point to your GoDaddy database. If you not sure what your values are, go back to database list and click pencil icon under "Action", this will open edit DB screen that has everything you need.

- Last touch: change default provider to "MSSQLBlogProvider" and you all set. Go to your web site and you should be greeted with "Welcome to BlogEngine.Net 1.3 with MSSQL provider". Below is snippet from my web.config.
<BlogEngine>
  <blogProvider defaultProvider="MSSQLBlogProvider">
    <providers>
      <add name="XmlBlogProvider" type="BlogEngine.Core.Providers.XmlBlogProvider, BlogEngine.Core"/>
      <add name="MSSQLBlogProvider" type="BlogEngine.Core.Providers.MSSQLBlogProvider, BlogEngine.Core"/>
    </providers>
  </blogProvider>
</BlogEngine>
<connectionStrings>
  <clear/>
  <add name="LocalSqlServer" connectionString="dummy"/>
  <add name="BlogEngine" connectionString="Server=youserver.secureserver.net;Database=db123;uid=id123;pwd=pwd123" providerName="System.Data.SqlClient" />
</connectionStrings>
Speaking about GoDaddy hosting, may be I'm just lucky but I'm yet to run into problem with this host. Everything seems to be working as expected and I'm one happy customer. If you run into issues following this simple guide - let me know!


